Video hàng đầu

Giày Trekking Leo Núi Sports - Lội Nước - Đế Mỏng, Mềm - Thoát Nước Nhanh
Mua hàng tại : https://shopee.vn/huy2405
- Ưu điểm nổi bật:
- Đế giày mỏng, mềm, đi vào cảm giác như đi chân trần, rất thoải mái khi đi bộ đường dài, leo núi, trekking, ...
- Phần trên của giày được làm bằng vải thoáng khí và khô nhanh ngoài trời chất lượng cao, có chức năng tăng cường thấm hút mồ hôi và làm khô nhanh, tạo cảm giác thoải mái khi đi xa, đi dài.
- Khi gặp nước, bạn nhấc chân lên khỏi nước thì ngay lập tức nước sẽ thoát ra từ hàng ngàn lỗ hổng nằm trên thân giày và đế giày.
- Các lỗ nhỏ ở đế giày thiết kế cùng với 1 lớp lưới thép có thể chống lại tất cả các vật nhọn sắc vô tình từ bên ngoài vào giày.
- Sườn giày có 1 miếng cao su bảo vệ cho bàn chân, giảm mỏi chân khi đi bộ.
- Đế giày được làm bằng đế giữa MD chống trượt và vật liệu cao su chống mài mòn, tăng khả năng ma sát với mặt đất.
- Có dây điều chỉnh kích thước giày vừa vặn với bàn chân của người dùng.
- Lót giày đàn hồi, thoáng khí mềm mại.
- Giày lội nước đa năng là lựa chọn tốt cho các bạn thích đi leo núi, dã ngoại, đi phượt, du lịch, trekking, đi bộ, tập thể thao, ...

Link Facebook : https://www.facebook.com/BabyB....us-Nh%E1%BA%A1c-Thi%
Click để xem các tập phim hoạt hình và bài hát bổ ích mỗi ngày nhé ►https://www.youtube.com/channe....l/UCA7QBnEDwHAEFTQpa
00:00 Hãy chon thứ mình cần nhất
00:05 Hãy chon thứ mình cần nhất
02:23 Mèo con biết tiết kiệm
04:36 Chuyến xe buýt cùng những người bạn
06:44 Không được để đồ đạc bừa bãi
08:55 Ai mới là chủ nhân của món quà
12:06 Bút sáp màu đáng yêu
14:22 Ngày bận rộn của thợ sửa xe
16:54 Vòng xoay bảy sắc cầu vồng
#babybusnhacthieunhi#nhacthieunhi#babybusvietnamese#kiki#miumiu#babybus#gấutrúc#hoathinhvuinhon#xecứuhỏa#bietdoisieucuuho#superrescueteam#youtubecartoon#kidvideo#kidsong#conmèo
BabyBus xin kính chào các quý bậc phụ huynh và các bé. Với BabyBus chúng tôi sẽ mang đến những trải nghiệm thú vị cho các bé thiếu nhi từ 2 đến 5 tuổi bằng những bài hát vui nhộn và những câu chuyện bổ ích với hoạt hình 2D & 3D sống động phù hợp với lứa tuổi của bé, từ đó các bé sẽ học được những thói quen tốt, dạy cho bé những kiến thức cơ bản đảm bảo an toàn, bảng chữ cái, cùng các con số, màu sắc và còn nhiều hơn nữa. Giúp cho bé được phát triển một cách toàn diện nhất.
Cùng Babybus đón xem video hay và bổ ích mỗi ngày nhé
BabyBus sẽ giúp cho các bé
★ biết suy nghĩ độc lập
★ xây dựng sự tự tin trong bé
★ biết lễ phép với người lớn và tôn trọng mọi người xung quanh
★ khám phá thế giới xung quanh của bé
Liên lạc với chúng tôi:
E-mail: [email protected]
Website: http://www.babybus.com

Ghế xếp có tựa đầu Naturehike Portable Folding Chair NH17Y010-Z - 9515 có kích thước lớn khi mở rộng. Được trang bị tựa lưng, giúp cảm giác ngồi luôn thoải mái, dễ chịu trong thời gian dài.
Với khả năng gọn tiện lợi kèm trọng lượng nhẹ nên rất dễ di chuyển, mang chiếc ghế theo người. Sản phẩm được yêu thích sử dụng khi trong các chuyến đi chơi, picnic, dã ngoại, cắm trại cuối tuần, câu cá…điều này được thể hiện rõ ở những ưu điểm như:
ĐẶC ĐIỂM NỔI BẬT:
- Khi mở rộng, ghế có kích thước lên tới 41,5 x 31 x 80 cm. Tuy nhiên, khi gấp lại thì có thể cất giữ trong 1 chiếc túi siêu nhỏ gọn, chỉ 42 x 16 cm.
- Trọng lượng tổng 1,2 kg, thuận tiện cho việc xách tay, mang theo người hay vận chuyển nhiều bằng xe máy, ô tô.
- Toàn bộ phần lưng ghế là sự kết hợp giữa sợi Polyester 600D và vải lưới. Kiểu dáng lõm ở giữa và ôm dọc phần lưng và 2 bên khiến người ngồi lọt vừa vặn ở giữa, rất êm ái và chắc chắn.
- Phía 2 bên hông và nửa dưới của lưng ghế có cấu tạo lưới giúp không bí, ngăn ra mồ hôi và thoáng khí hơn, dễ chịu khi ngồi thời gian dài. Điều này là một ưu điểm khi ngồi câu cá, đọc sách, nghỉ ngơi – có thể lên tới nhiều giờ.
- Do sự đàn hồi của bộ khung (các đoạn nối khung sử dụng nhựa ABS giúp đàn hồi đáng kể, chịu va đập tốt) và sợi Polyester, ghế rất êm ái và uyển chuyển theo cử động của người dùng, không gây vướng hoặc cứng khó chịu.
- Phía bên hông, túi đựng đồ cá nhân, điện thoại, đồ ăn, nước uống được thiết kế tiện lợi, cất giữ dễ dàng. Và người sử dụng không cần đứng lên, ngồi xuống quá nhiều hoặc lo chỗ để đồ khi đang thư giãn.
- Naturehike đã chọn lọc nguyên liệu đầu vào rất tốt, sử dụng toàn bộ các chi tiết khung là hợp kim nhôm. Vì lý do đó, độ bền của sản phẩm tăng lên đáng kể.
- Khung nhôm chống gỉ và sợi Polyester không thấm nước nên việc vệ sinh sau mỗi lần sử dụng cũng tốn ít thời gian, rất nhanh chóng.
===
Tại WETREK.VN, chúng tôi tin rằng “Cuộc sống gần gũi với thiên nhiên luôn đáng sống". WETREK.VN khích lệ, tương trợ và trang bị mọi người tham gia các Hoạt động Thể thao, Giải Trí Ngoài Trời theo các tiêu chí An Toàn, Trách Nhiệm, Sướng.
✅ Website: wetrek.vn
✅ Link sản phẩm: https://wetrek.vn/san-pham/ghe....-xep-co-tua-dau-natu
✅ Hotline:02873051988 | Email: [email protected]
✅ Hệ thống cửa hàng:
- Số 235 Hoàng Văn Thụ, P.8, Q.Phú Nhuận, TP.HCM
- Số 530 Đường Láng, Đống Đa, HN
✅ Thời gian mở cửa: Từ 8h30 - 21h30 tất cả các ngày trong tuần
WETREK.VN cũng là thư viện điện tử nơi bạn có thể dễ dàng tìm thấy những kiến thức về Giải Trí Ngoài Trời (WeTrekology) và những trải nghiệm hữu ích, thực tế được chia sẻ từ đông đảo các bạn, khách hàng, đối tác có cùng đam mê và Sống Cá Tính (Live Out Loud). WETREK.VN cũng là nơi gắn kết, là nơi giao lưu, học hỏi, kết bạn, nơi hội tụ của tình hữu nghị thân ái đối với tất cả thành viên (WeTrekers).
✅ Thư viện WETREKOLOGY - Kinh nghiệm Outdoor: https://wetrek.vn/kinh-nghiem.htm
✅ Bài viết Cộng Đồng WETREKERS: https://m.wetrek.vn/bai-viet-thanh-vien.htm
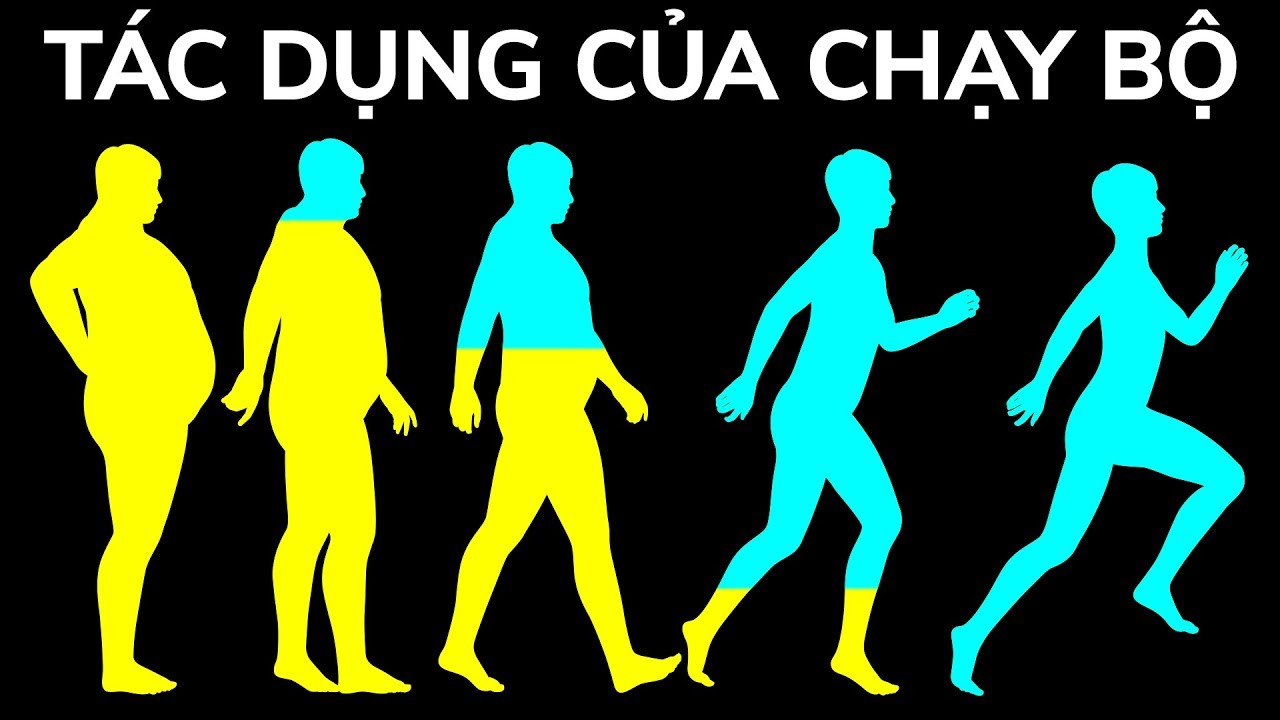
Mọi chuyện bắt đầu khi một người bạn mời tôi chạy 5k với cậu ấy – nghĩa là 5 km. Nghe có vẻ không giống lắm, nhưng chừng đó là quá nhiều khi bạn gần ba mươi tuổi và chưa bao giờ chạy lại kể từ khi học thể dục ở cấp ba. Chưa kể đến việc tôi hầu như không có năng lượng và bị tăng cân khi trưởng thành nữa. Dù sao thì tôi cũng chỉ có một tháng để chuẩn bị. Tôi đã làm điều đó như thế nào?
Câu trả lời ngắn gọn là từng bước một! Tất nhiên, bạn nên xem xét những gì mình ăn, luôn bù nước và tập luyện chậm rãi nhưng kiên trì. Sau khi mua một đôi giày chạy bộ mới, hành trình của tôi đã bắt đầu. Tôi đã ghi nhật ký về sự tiến triển của mình suốt thời gian trên. Thế còn bạn? Bạn đã sẵn sàng thắt dây giày của mình và bắt đầu chạy chưa?
DẤU THỜI GIAN:
Tôi đã bắt đầu như thế nào 0:54
Các thực phẩm cung cấp năng lượng cho việc chạy bộ 1:38
Tại sao tôi lại tìm kiếm nhóm chạy bộ 2:15
Tập luyện chéo 2:43
Một điều tuyệt vời đã xảy ra! 2:55
Cân nặng của tôi 3:39
Một luồng gió mới của động lực 4:29
Làn da của tôi... wow! 5:23
Rất nhiều chuối 7:03
Tôi đã làm được! 7:29
🔴 Các lời khuyên tôi có thể đưa ra 🔴 7:42
#chạybộ #tậpluyện #soisáng
TÓM LƯỢC:
- Ý tưởng là đi bộ 2 phút, chạy trong 1 phút và lặp đi lặp lại nhiều lần cho đến khi tổng thời gian chạy bộ đạt 30 phút.
- Thực phẩm dành cho việc chạy bộ bao gồm chuối, yến mạch, bơ đậu phộng, bông cải xanh, sữa chua nguyên chất, sôcôla đen, mì ống, khoai tây và cà phê.
- Hôm nay cũng đau cả người sau buổi tập gym điên rồ. Tôi đoán đó sẽ là điều bình thường vào tháng sau.
- Huấn luyện viên đề nghị đi xe đạp như một cách để luyện tập chéo, vậy nên tôi đã đạp xe 4,8 km.
- Mức năng lượng của tôi đã lên rất cao! Tôi không thèm ngủ trưa nữa.
- Hôm nay tôi đã kiểm tra cân nặng và nhận ra đã giảm được 2 kg. Tôi đã bị thuyết phục rằng chạy bộ là cách nhanh nhất để giảm cân.
- Hôm nay tôi đã chạy bộ cả 10 phút và không phải cố gắng gì hết! Tôi sắp làm được rồi!
- Huấn luyện viên nói với tôi rằng cần phải hết sức cẩn thận về vấn đề giữ nước. Anh ấy bảo tôi hãy chia đôi trọng lượng cơ thể, sau đó uống 65 ml cho một kg.
- Tôi đoán là tập thể dục sẽ cải thiện làn da của bạn vì nó tăng cường lưu thông máu.
- Huấn luyện viên cho tôi biết cách dùng quả banh tennis để mát xa các vùng gặp vấn đề. Tôi đã làm thế cho vùng dưới bàn chân nữa.
- Nghe nhạc trong khi chạy bộ giúp thời gian trôi nhanh hơn rất nhiều.
- Rất nhiều chuối. Tôi được bảo rằng kali sẽ giúp cân bằng các chất điện giải mà tôi mất khi chạy lâu hơn.
- Tôi nghĩ chương trình tập luyện đã hiệu quả vì cuộc thi khá dễ dàng và thú vị. Tôi không thể đợi để đăng kí cho cuộc đua tiếp theo!
Âm nhạc của Epidemic Sound https://www.epidemicsound.com/
Tài liệu chứng khoán (hình ảnh, cảnh quay và khác):
https://www.depositphotos.com
https://www.shutterstock.com
https://www.eastnews.ru
Đăng ký Soi Sáng https://bit.ly/2TPVZhq
5 PHÚT THỦ CÔNG https://bit.ly/2F0If0m
123GO! https://bit.ly/2m3P6y2
CHUYỆN KỂ CÓ THẬT https://bit.ly/2kkDoP7

Game Cực Hay tuyển người Viết Nội Dung: https://www.shorturl.at/uzFIQ
Chơi game, chạy bộ RA TIỀN? | LÀM GIÀU KHÔNG KHÓ? | Play2Earn & Move2Earn
------------------------------------------------------
Script: Lucy
Voice: Ming Ming
Editor: Kyanu Reeves
------------------------------------------------------
Fanpage: https://www.facebook.com/gamecuchayvn/
Group: https://www.facebook.com/groups/gamecuchay/
Discord: https://discord.gg/fu7hrh9z4X
#gamecuchay #bocphot

Noise Pollution.
For more videos go to:
https://www.youtube.com/user/l....earningjunction/vide
Stay tuned for more videos.

Caddy Bay Sản phẩm thay thế ổ DVD gắn trong Laptop bằng ổ cứng 2.5 inch, giúp bạn tận dụng ổ cứng HDD cũ sau khi đã nâng cấp lên SSD.
Chất liệu: nhôm + nhựa
Kích thước: Loại Dày 12,9mm, Loại mỏng: 9,5mm (các bạn muốn nâng cấp thì nên xem kỹ ổ DVD laptop của mình là loại nào nhé, tránh mua nhầm.)
Chuẩn kết nối: SataHỗ trợ các loại ổ cứng: cứng: 2.5 HDD, SATA-I, SATA-II, SATA-III, SDDCác bạn có thể order trên web site Caddy bay
Giá rẻ: https://goo.gl/GAcg7N
Caddy loại tốt Orico: https://goo.gl/xVn95Y
*Đánh giá khi sử dụng:
Ưu điểm:- Giá rẻ hạt giẻ tại lazada: https://goo.gl/GAcg7N
- chất liệu nhôm nhựa hoàn thiện ở mức tạm được
- thao tác lắp đặt dẽ dàng
Nhược điểm:
- dễ cong vênh
- lâu lâu mất kết nối với laptop
- truy xuất giữ liệu đôi khi gặp tình trạng bị treo (mình test bằng ổ HDD)
- vì là sản phẩm giá rẻ nên cũng không nên đòi hỏi nhiều, mình khuyên các bạn nếu muốn gắn thêm Caddy bay để tận dụng ổ cứng cũ thì nênchọn sản phẩm khác có chất lượng tốt hơn.
#caddybay #hdd #ssd
--------------------------------------------------------------------------
Video được phát hành bởi Namdesign


Đi biển nhiều nhưng đây là lần đầu tiên mình nghe thấy loại ghẹ phát sáng thế này. Đúng là con này khó tìm ngoài chợ lắm. May mắn cho mình là đang đi quay phim thì gặp các anh ngư dân tốt bụng mời tham gia nhậu. Mỗi anh đến từ một nơi mọi người ạ. Nhưng vì cùng cảnh lênh đênh trên biển nên các anh ấy thân nhau lắm. Cảm giác như mọi người sẵn sàng giúp đỡ người khác ấy.
Các bạn thấy người Việt Nam mình thân thiện không nào !
Ủng hộ Nếm TV bằng cách mua hàng tại shop:
☞ Link Shopee: https://shp.ee/kuc2pk4
Nếu video hay và hấp dẫn, các bạn đừng quên thích, chia sẻ, đăng ký và nhấn chuông thông báo để nhận được những video mới nhất từ Nếm TV nhé.
☞ Link Đăng Kí: https://bit.ly/2TbFD5h
Đăng ký thêm kênh "NHÀ NẾM" để xem những vlog đời thường khác của Nếm
☞ Link channel NHÀ NẾM: https://bit.ly/2SSNk03
Cảm ơn các bạn đã theo dõi video.
Hẹn gặp lại!!!!
--------------------------------------------
*Facebook Tùng Nếm:
https://www.facebook.com/tungdt.hpvn
* Fanpage Nếm:
https://www.facebook.com/nemtv.vn/
* Website Nếm:
https://nemtv.vn/
#Nếm #NemTV #ConDao

Chúng ta ai cũng từng trải qua: những vết mồ hôi khó chịu phá hỏng vẻ ngoài của chúng ta, bị bắt gặp khi dang dở trong nhà vệ sinh và có vết son trên răng. Vì vậy, hôm nay tôi sẽ chỉ cho bạn một số thủ thuật nhằm tránh các tình huống khó xử này. Nếu nách áo của bạn bị ố vàng do mồ hôi, bạn có thể dùng một chiếc khăn buộc cổ để che lại. Vấn đề đã được giải quyết!
Tôi cũng sẽ chỉ bạn một cách nhanh chóng để tự tạo tấm che mặt để che toàn bộ khuôn mặt và tránh tình trạng mặt rám nắng không đều. Mặc áo ngực lỏng đúng là quá khó chịu, nhưng tôi sẽ chỉ cho bạn một cách khắc phục vừa nhanh vừa khiến bạn trông thật sành điệu.
Khi "tào tháo đuổi" trong nhà vệ sinh thì bạn rất dễ quên khóa cửa, vì vậy, tôi sẽ dạy bạn một mẹo để đảm bảo không ai xông vào.
Bạn có thể loại bỏ xơ và lông tơ trên quần legging với một lưỡi dao rọc giấy và lược; đó là một phương pháp hiệu quả giúp chiếc quần legging của bạn trông như mới.
Tôi cũng sẽ hướng dẫn bạn mẹo để tránh vết son dính trên răng!
DẤU THỜI GIAN:
0:09 - Vệt mồ hôi trên áo
1:25 - Cháy nắng không đều do khẩu trang
3:02 - Áo ngực lỏng lẻo bị tuột ra
5:29 - Quên khóa cửa phòng vệ sinh
6:41 - Quần cạp trễ
7:59 - Đang sửa dây đeo ví bị đứt
9:14 - Vết son trên răng của bạn
Video này được thực hiện cho mục đích giải trí. Chúng tôi không đưa ra bất kỳ sự bảo đảm nào về tính đầy đủ, an toàn và độ tin cậy. Bất kỳ hành động nào bạn thực hiện dựa theo thông tin trên video này đều tự chịu rủi ro và chúng tôi sẽ không chịu trách nhiệm cho bất kỳ thiệt hại hoặc tổn thất nào. Trách nhiệm của người xem là sử dụng có phán đoán, chăm sóc và phòng ngừa nếu có kế hoạch bắt chước, mô phỏng.
Video sau đây có thể có hành động được thực hiện bởi các diễn viên của chúng tôi trong môi trường được kiểm soát - vui lòng sử dụng biện pháp phán đoán, chăm sóc và phòng ngừa nếu bạn dự định sao chép.
Tất cả những tên sản phẩm và tên công ty xuất hiện trong video này là thương hiệu™ hoặc thương hiệu được đăng ký® của những tổ chức tương ứng. Việc sử dụng chúng không đồng nghĩa với việc chúng tôi có liên quan hay chứng thực cho các thương hiệu này.
------------------------------------------
Đăng ký 5 PHÚT THỦ CÔNG https://bit.ly/2F0If0m
Music by Epidemic Sound: https://www.epidemicsound.com/
Tài liệu chứng khoán (hình ảnh, cảnh quay và khác):
https://www.depositphotos.com

TRANG TRÍ BÁNH ĐỘC ĐÁO MÀ MỌI ĐẦU BẾP MỚI NÊN THỬ
Trong khi bạn đang cố gắng thử những công thức làm bánh đơn giản để có thể sáng tạo ra những món bánh ngon ngọt tuyệt vời thì những đầu bếp mới lại quên mất đi việc thử nghiệm những cách trang trí sáng tạo và cực dễ làm này.Một trong số chúng sẽ khiến bạn thoả mãn cực kỳ khi nhìn vào và thật dễ để thử nó trong việc tạo nên một chiếc bánh riêng của mình cho các buổi tiệc - Có ai mà không thích ăn đồ ăn trong buổi tiệc chứ? Chà, trong video này tôi sẽ hướng dẫn từng bước dễ dàng về cách trang trí bánh với những mẹo vặt nấu ăn của tôi cho bạn nhé.
Mạch men và đường phủ là những nguyên liệu mà bạn cần có. Tôi sẽ chỉ cho bạn cách sử dụng chúng như giấy nến để tạo ra những đồ trang trí 3D đẹp mắt cho bánh sinh nhật đấy. Tôi cũng sẽ chỉ cho bạn cách đổ men lỏng lên trên một chiếc bánh để biến nó thành một chiếc bánh galaxy - giống như những gì chúng ta thấy trên Instagram nữa đó.
Bạn cũng có thể thêm một số màu thực phẩm vào kem đã được đánh bông lên và biến nó thành một chiếc bánh hoa 3D cho bữa tiệc của bạn.
Một ý tưởng sáng tạo khác là đổ sô cô la lỏng và thử một số thiết kế thú vị với nó. Chẳng hạn như những miếng sô cô la vỡ trên một chiếc bánh bề mặt màu trắng hoặc trang trí trông như hoa bằng cách sử dụng chuỗi sô cô la tan chảy nhé.
Dấu thời gian:
0:07 - Trang trí bánh gây hứng thú đặc biệt
1:55 - Cách trang trí bánh bằng sô cô la tan chảy
3:20 - Hướng dẫn làm đẹp với sô cô la
3:46 - Bánh cầu vồng - kem tươi có màu
5:32 - Cách làm mặt trăng bằng mạch men
7:19 - Hướng dẫn tráng mạch men bánh kẹo
8:46 - Cách làm bàn đạp bằng mạch men
12:12 - Trang trí dán đường
#bánh #trangtrí #hứngthúđặcbiệt
------------------------------------------
Đăng ký 5 PHÚT THỦ CÔNG https://bit.ly/2F0If0m
Soi Sáng Youtube: https://bit.ly/2TPVZhq
CHUYỆN KỂ CÓ THẬT: https://bit.ly/2kkDoP7
123GO! Vietnamese: https://bit.ly/2m3P6y2
123 GO! Challenge Vietnamese: https://bit.ly/35f0N6r
Music by Epidemic Sound: https://www.epidemicsound.com/
Tài liệu chứng khoán (hình ảnh, cảnh quay và khác):
https://www.depositphotos.com

Mô tả
Ý tưởng và thủ thuật lau dọn tuyệt vời
Nhà sạch thì mát, bát sạch ngon cơm. Ngôi nhà sạch và ngăn nắp sẽ khiến ta thoải mái và xua đi mọi căng thẳng. Nhưng đôi khi, dọn dẹp lại mất quá nhiều thời gian và công sức.
Chà, hôm nay mình sẽ gợi ý các thủ thuật đơn giản để sửa các vật dụng trong nhà và lau dọn sạch tinh tươm.
Nếu lá trên cây trồng trong nhà xỉn màu, hãy dùng mayo.
Nếu thảm đã cũ và xơ cứng, tôi sẽ chỉ bạn cách khắc phục với nước, dầu ủ, bàn chải tròn và máy sấy. - Thủ thuật này sẽ khiến thảm mềm mượt trở lại.
Tôi sẽ gửi đến bạn các ý tưởng về vật dụng tân tiến. Ví dụ như bạn có thể dùng máy là tóc để làm bỏng ngô cùng nhiều thủ thuật tuyệt vời khác.
Dấu thời gian:
3:20 - Ứng dụng mới cho các vật dụng gia đình
5:00 - Ý tưởng dọn dẹp tuyệt vời
6:54 - Dụng cụ giặt thảm tự làm
8:51 - Cách loại bỏ vết xước trên sàn
11:26 - Cách giữ tủ lạnh sạch sẽ bằng màng bọc thực phẩm
Video này được thực hiện cho mục đích giải trí. Chúng tôi không đưa ra bất kỳ sự bảo đảm nào về tính đầy đủ, an toàn và độ tin cậy. Bất kỳ hành động nào bạn thực hiện dựa theo thông tin trên video này đều tự chịu rủi ro và chúng tôi sẽ không chịu trách nhiệm cho bất kỳ thiệt hại hoặc tổn thất nào. Trách nhiệm của người xem là sử dụng có phán đoán, chăm sóc và phòng ngừa nếu có kế hoạch bắt chước, mô phỏng.
Video sau đây có thể có hành động được thực hiện bởi các diễn viên của chúng tôi trong môi trường được kiểm soát - vui lòng sử dụng biện pháp phán đoán, chăm sóc và phòng ngừa nếu bạn dự định sao chép.
------------------------------------------
Đăng ký 5 PHÚT THỦ CÔNG https://bit.ly/2F0If0m
Music by Epidemic Sound: https://www.epidemicsound.com/
Tài liệu chứng khoán (hình ảnh, cảnh quay và khác):
https://www.depositphotos.com
TÌNH HUỐNG HÀI HƯỚC VÀ KỲ LẠ ĐA SỐ AI CŨNG ĐÃ TRẢI QUA
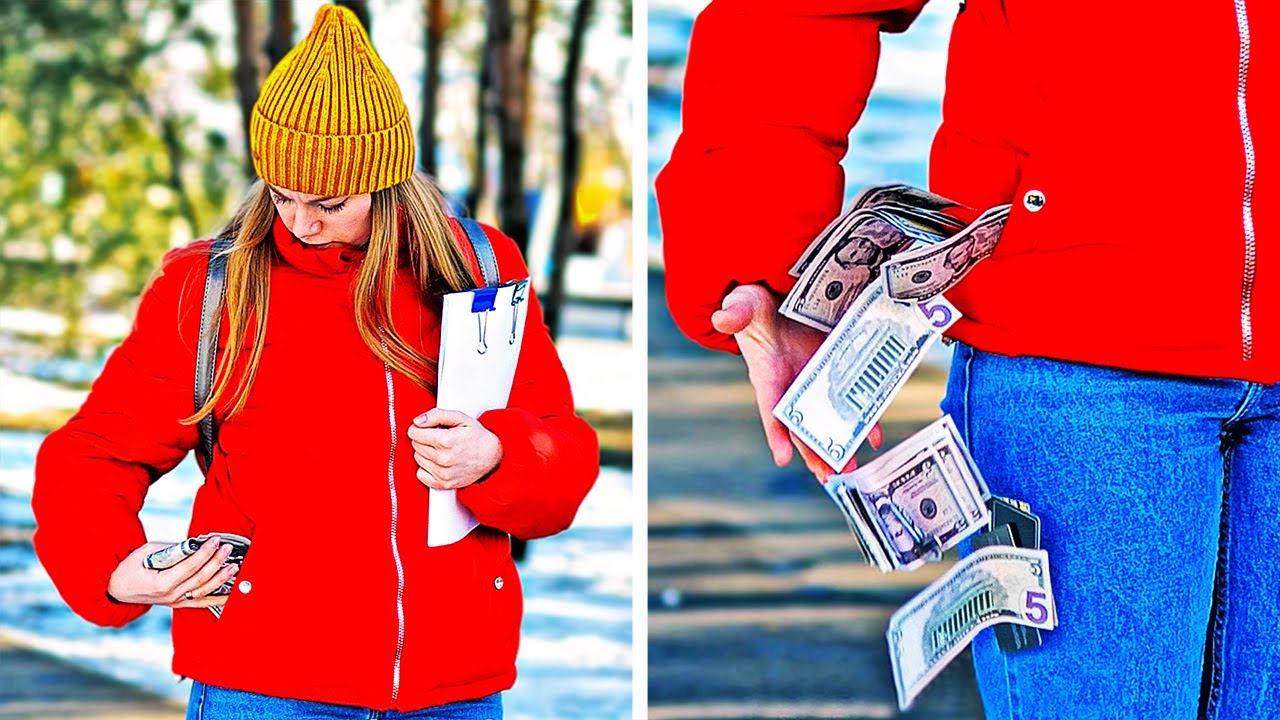
Để tránh mất chìa khóa, hãy gắn chúng vào phần chân kim loại của kẹp giấy, và rồi gắn tiền của bạn vào đó luôn - cả chùm luôn.
Bạn có thể lấy chiếc bàn chải cũ, hơ nóng qua lửa và dùng nó để làm sạch những phần khó với tới trong bồn vệ sinh.
Để tránh làm dây nước uống lên bài, hãy cắt phần đáy bóng bay, sau đó gắn nó vào ly uống nước của bạn.
Bạn có thể gắn một chiếc lược vào dao cạo và dùng nó để quét sạch đám xơ vải và xơ bông trên áo len.
Nếu bạn đeo găng tay và không thể bấm điện thoại, bạn có thể mang theo giấy bạc để xử lý vấn đề. - Gắn nó vào găng tay bạn là xong.
Tôi cũng sẽ cho bạn thấy vài mẹo giúp bạn tránh vi khuẩn. Ví dụ như là mở vòi nước nhà vệ sinh bằng phần cổ tay hoặc nhấn lọ đựng xà phòng bằng khuỷu tay. Đừng quên mở cửa nhà vệ sinh với khăn giấy chứ không phải tay bạn nha.
Dấu thời gian:
0:47 – Tự làm cốc chống tràn
1:26 – Tự làm nước ép dưa hấu
2:28 – Cách lấy nút chai rượu
4:20 – Rửa tay đúng cách
5:35 – Đeo tai nghe đúng cách
6:29 – Mẹo hay với đám dây rợ
8:44 – Tự làm kẹp gắp
10:51 – Cách xắt khoai tây đơn giản
12:24 – Mẹo vẽ tường
Video này được thực hiện cho mục đích giải trí. Chúng tôi không đưa ra bất kỳ sự bảo đảm nào về tính đầy đủ, an toàn và độ tin cậy. Bất kỳ hành động nào bạn thực hiện dựa theo thông tin trên video này đều tự chịu rủi ro và chúng tôi sẽ không chịu trách nhiệm cho bất kỳ thiệt hại hoặc tổn thất nào. Trách nhiệm của người xem là sử dụng có phán đoán, chăm sóc và phòng ngừa nếu có kế hoạch bắt chước, mô phỏng.
Video sau đây có thể có hành động được thực hiện bởi các diễn viên của chúng tôi trong môi trường được kiểm soát - vui lòng sử dụng biện pháp phán đoán, chăm sóc và phòng ngừa nếu bạn dự định sao chép.
------------------------------------------
Đăng ký 5 PHÚT THỦ CÔNG https://bit.ly/2F0If0m
Soi Sáng Youtube: https://bit.ly/2TPVZhq
CHUYỆN KỂ CÓ THẬT: https://bit.ly/2kkDoP7
123GO! Vietnamese: https://bit.ly/2m3P6y2
123 GO! Challenge Vietnamese: https://bit.ly/35f0N6r
Music by Epidemic Sound: https://www.epidemicsound.com/
Tài liệu chứng khoán (hình ảnh, cảnh quay và khác):
https://www.depositphotos.com
Những mẹo chăm sóc da và làm đẹp sẽ giải quyết mọi vấn đề của bạn
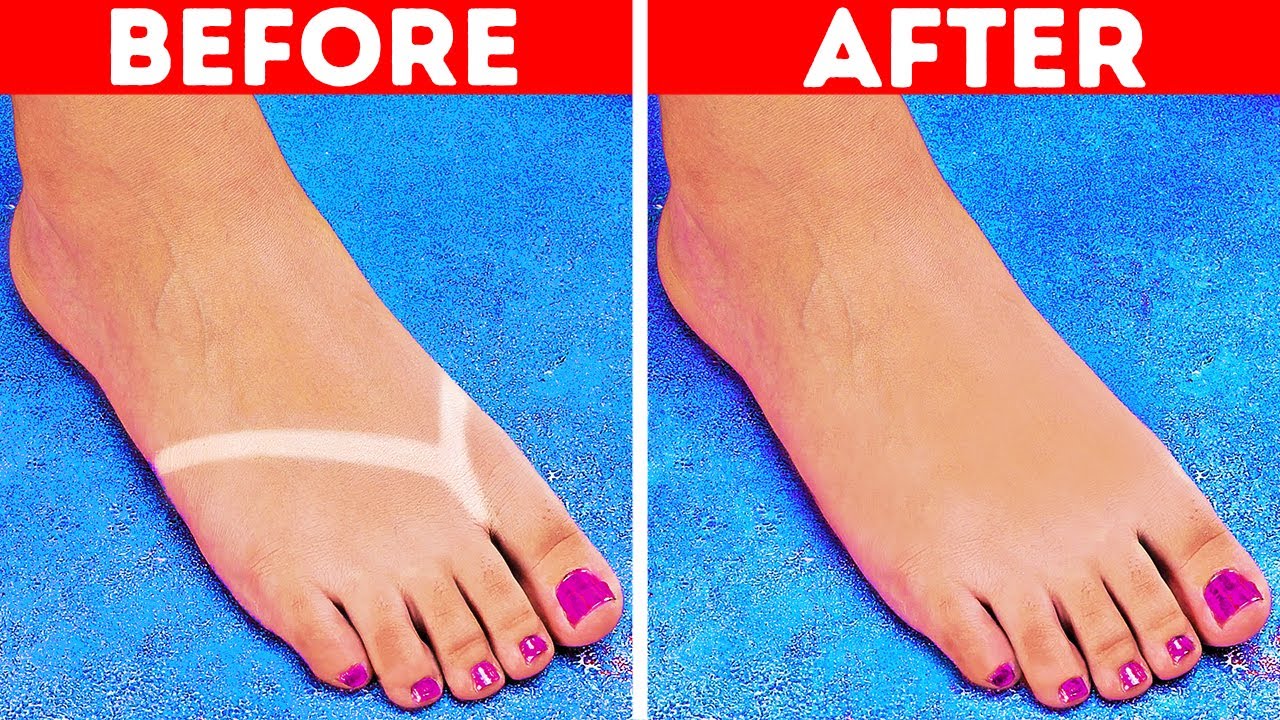
Làn da của chúng ta thay đổi trong mùa hè, và thời tiết nóng bức ảnh hưởng nặng nề đến nó. Ngoài việc bị cháy nắng thường xuyên, chúng ta còn gặp phải tình trạng khô da, và đôi khi vết rám nắng có vẻ không đồng đều hoặc loang lổ. Hôm nay, tôi chỉ cho bạn một số phương pháp làm đẹp tự nhiên sẽ giúp bạn khắc phục tất cả những vấn đề nhỏ khó chịu đó và bày tỏ tình yêu với làn da của bạn như nó xứng đáng.
Ví dụ, tôi sẽ chỉ cho bạn phương pháp tốt nhất để loại bỏ mụn đầu đen trên mũi, và nhiều cách để dùng các thành phần tự nhiên trong quy trình chăm sóc da. Một số thành phần là cà chua, nha đam, đường, bột yến mạch và thậm chí là bạc hà.
Khi chúng ta phơi nắng nhiều, tóc khô và xơ xác là điều không thể tránh khỏi, nhưng bạn có thể khắc phục điều đó bằng một quả bơ và vài giọt dầu jojoba.
Với những lần bạn muốn trông thật hoàn mỹ trong mùa hè, tôi sẽ chỉ cho bạn một số mẹo trang phục đơn giản để thử và các mẹo phối đồ sẽ truyền cảm hứng cho những bộ cánh mới của bạn.
Dấu thời gian:
0:43 - Tẩy da chết tự nhiên
2:15 - Xà phòng tẩy tế bào chết tự làm
5:20 - Kem làm rám nắng tự nhiên
8:06 - Mẹo sửa quần áo thông minh
9:48 - Tự làm áo mặc khi đi xe đạp từ khăn quàng
Video này được thực hiện cho mục đích giải trí. Chúng tôi không đưa ra bất kỳ sự bảo đảm nào về tính đầy đủ, an toàn và độ tin cậy. Bất kỳ hành động nào bạn thực hiện dựa theo thông tin trên video này đều tự chịu rủi ro và chúng tôi sẽ không chịu trách nhiệm cho bất kỳ thiệt hại hoặc tổn thất nào. Trách nhiệm của người xem là sử dụng có phán đoán, chăm sóc và phòng ngừa nếu có kế hoạch bắt chước, mô phỏng.
Video sau đây có thể có hành động được thực hiện bởi các diễn viên của chúng tôi trong môi trường được kiểm soát - vui lòng sử dụng biện pháp phán đoán, chăm sóc và phòng ngừa nếu bạn dự định sao chép.
------------------------------------------
Đăng ký 5 PHÚT THỦ CÔNG https://bit.ly/2F0If0m
Music by Epidemic Sound: https://www.epidemicsound.com/
Tài liệu chứng khoán (hình ảnh, cảnh quay và khác):
https://www.depositphotos.com
NHỮNG HÌNH ẢNH VUI NHỘN ĐẾN TỪ THỰC TẾ
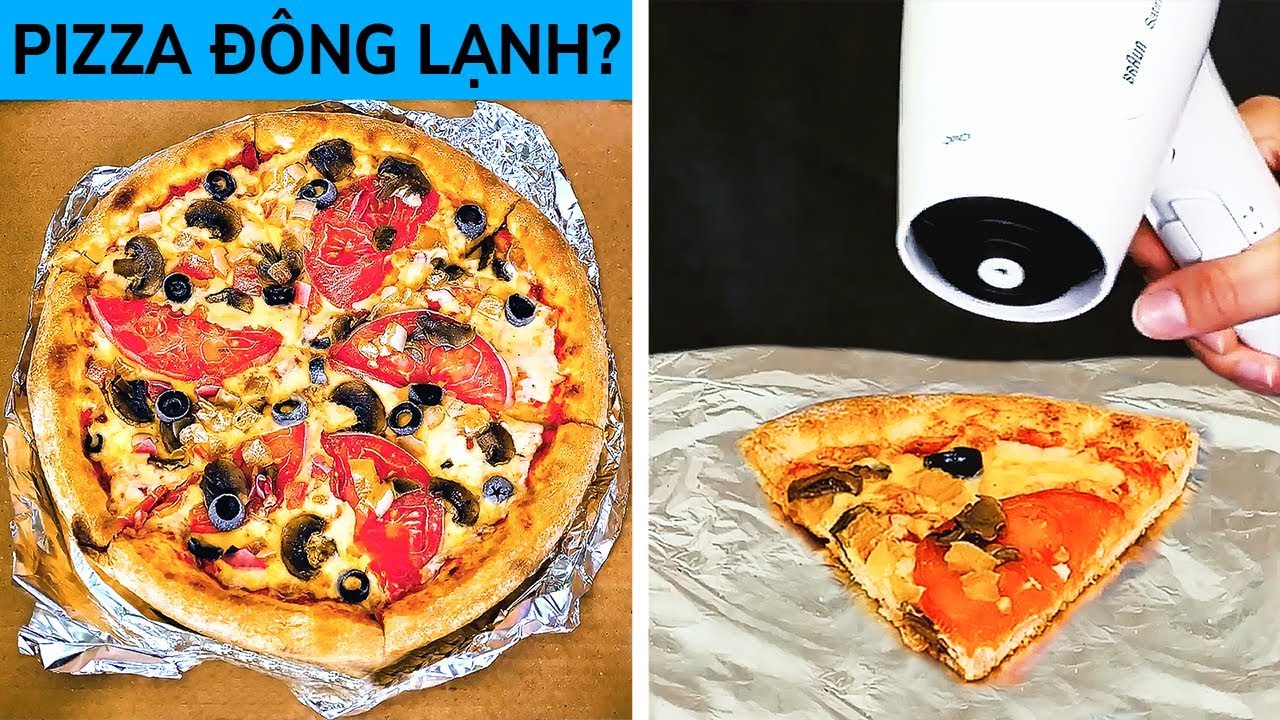
Hãy khám phá những mẹo dành cho nhà bếp và những pha nấu ăn bất thành cực hay ho này nao. Bạn có thể dễ dàng hâm lạo pizza bằng bàn ủi và máy sấy tóc. Các này chính là một phương pháp thay thế hoàn hảo cho lò vi sóng. Hãy tạo nên một chiếc muỗng khẩn cấp bằng một cái ly nhựa và một cái nĩa. Vâng, nghe thật lạ lùng nhưng thủ thuật này cực kỳ hữu ích đấy.
Chúng tôi đã chuẩn bị cho các bạn một số thước phim vui nhộn về những pha nấu ăn thất bại. Rất nhiều vấn đề khác nhau có thể xảy ra tại căn bếp nếu bạn quá lười để tìm một cái chao để vớt pasta và thế là pasta bị đổ xuống bồn nước. Tôi rất thích làm bánh quy nhưng những miếng bánh quy của tôi thường có hình dạng khá kỳ lạ. Động vật thì trông giống quái vật. Tuy nhiên, chúng ngon lắm đấy. Một sự thất bại nữa đó là khi bạn nấu rau mâm xôi thì nó teo lại chỉ còn một chút.
Hầu hết chúng ta đều chẳng thích chia sẻ đồ ăn, đặc biệt là kẹo. Nếu bạn thích kẹo và bánh thì bạn sẽ không thích cho người khác ăn chung chiếc bánh yêu thích của mình. Hãy cắt ra một miếng nhỏ cho bạn của mình và ăn hết phần còn lại. Hầu hết mọi người đều ghét phải chia sẻ đồ ăn, nhất là khi bạn đã đặt được những món mình thích tại nhà hàng. Gái à, bạn có ăn đồ ăn của bạn trai mình không?
Hãy khám phá những ý tưởng mà chắc chắn bạn sẽ yêu thích này nào! Bạn có thể tạo nên một cái vòi sen khẩn cấp rất dễ dàng. Hãy đục những chiếc lỗ trên một cái chai nhựa và theo dõi tiếp các hướng dẫn của chúng tôi! Nếu bạn không có cục sạc dự phòng bên mình thì hãy sạc điện thoại bằng một cục sạc thủ công làm từ cục sạc trên xe hơi và và pin 9 vôn. Hãy khám phá những ý tưởng diệt côn trùng sáng tạo nhất và quên đi đám muỗi trong nhà nào.
DẤU THỜI GIAN:
TIMESTAMPS:
00:09 Cách hâm lại pizza
00:47 Vòi sen khẩn cấp
03:20 Tự làm cục sạc di động
05:16 Những lần nấu ăn thất bại
10:01 Chia sẽ là yêu thương?
------------------------------------------
Kênh tiếng Việt chính thức của 5-Minute Crafts
Soi Sáng Youtube: https://bit.ly/2TPVZhq
Music by Epidemic Sound: https://www.epidemicsound.com/

CÁC Ý TƯỞNG ĐỘC ĐÁO TẠI NHÀ
Chúng tôi luôn tìm kiếm những ý tưởng để khiến cuộc sống mọi người dễ dàng hơn. Lần này, chúng tôi đã sưu tầm được các mẹo vặt độc đáo để giải quyết các vấn đề có thể rất phiền toái. Hãy xem video này và học được những mẹo vặt tuyệt vời nhé:
- Làm sao để lấy các sợi vải vụn khỏi chiếc áo len yêu thích nào?
- Cách cất giữ bít tất tiết kiệm không gian nhất.
- Dùng các túi quà tặng cũ xinh để giữ những thứ đồ lặt vặt trong tủ quần áo.
- Cách tuyệt vời để cất vòng tay - hãy dùng giá treo cuộn giấy nhé.
- Bạn có luôn gặp vấn đề khi các sợi dây cứ cuộn với nhau làm rối tung lên hết cả không? Hãy xem phương pháp đơn giản để giải quyết nhé.
- Dùng ống xốp luồn vào giày boot và chúng sẽ không bị đổ nữa.
- Hãy biến thùng các tông thành một cái bàn để máy tính, và bạn có thể làm việc trên ghế bành được rồi.
- Hãy giữ cho những ngón tay của bạn được an toàn với dụng cụ bảo vệ khỏi dầu sôi. Hãy cắt phần đầu của chai nước và dùng nó khi nấu ăn nhé.
- Mẹo này thì quá hoành tráng luôn - dùng vợt tennis thay cho cái rá lọc nước. Ngạc nhiên chưa?
- Một cái kệ đựng giày giá rẻ thì sao nhỉ? Những gì bạn cần chỉ là kệ gỗ đựng đồ thôi.
- Nếu không có dao cắt pizza, hãy thay thế nó bằng nắp can thực phẩm đóng hộp nhé.
- Ai dùng điện thoại thông minh cũng sợ pin yếu, nhưng nếu đang ra ngoài và không mang theo sạc dự phòng thì sao? Hãy tự làm một cái theo hướng dẫn trong video nhé.
Hãy chia sẻ những ý tưởng tuyệt vời trên với bạn bè nào.
DẤU THỜI GIAN:
00:28 Cách sắp xếp bít tất
01:25 Giữ vòng tay thật gọn gàng
03:01 Ống xốp cho giày boot cao
04:55 Thủ thuật selfie
05:57 Tự làm dao cắt pizza
13:18 Tái sử dụng dép xỏ ngón
------------------------------------------
Kênh tiếng Việt chính thức của 5-Minute Crafts
Soi Sáng Youtube: https://bit.ly/2TPVZhq
CHUYỆN KỂ CÓ THẬT: https://bit.ly/2kkDoP7
123GO! Vietnamese: https://bit.ly/2m3P6y2
Music by Epidemic Sound: https://www.epidemicsound.com/

TỔ CHỨC GIÁNG SINH BẠN CÓ THỂ LÀM VỚI PASTA
Ngày lễ đang đến và thời gian để suy nghĩ về trang trí nhà cửa. Đồ trang trí Giáng sinh có thể đắt tiền và bạn sẽ học cách làm đồ trang trí DIY trông tuyệt vời. Dưới đây là toàn bộ bộ sưu tập các dự án Giáng sinh kỳ diệu sẽ làm cho căn phòng của bạn trở nên lễ hội nhất có thể. Bạn sẽ tìm thấy những đồ trang trí Giáng sinh tự làm như vòng hoa ngày lễ, cây Giáng sinh đơn giản, trang trí bàn làm từ các loại mì ống khác nhau. Vâng, nó không phải là một trò đùa vì có nhiều hình dạng mì ống khác nhau và bạn thậm chí có thể tạo ra các bức tượng nhỏ từ mì ống. Bạn sẽ cần phải mua các loại mì ống khác nhau như cà vạt nơ, penne, mì ống ruy băng, fusilli và khác.
Hơn nữa, bạn sẽ cần phun sơn để trang trí. Chúng tôi dùng sơn bạc, vàng. Bạn sẽ học cách làm thiên thần cho cây thông Noel, trang trí bàn, thiên nga, cây Giáng sinh, vòng hoa từ mì ống. Để làm một vòng hoa đơn giản nhưng dễ thương, bạn sẽ cần một chiếc vòng thêu, mì ống nơ, hạt cườm và ruy băng. Sử dụng keo nóng gắn nơ buộc nơ vào vòng và chúng tôi hiển thị trong video của chúng tôi và trang trí bằng hạt hoặc bất cứ điều gì bạn thích.
Hãy để ý làm đồ trang trí bông tuyết nhanh từ mì ống penne. Đơn giản chỉ cần tạo một bông tuyết hoặc hình ngôi sao bằng cách sử dụng keo nóng và trang trí bằng ngọc trai giả lấp lánh. Hoặc thậm chí bạn có thể với sơn phun. Một ý tưởng siêu dễ dàng nữa là Vòng hoa DIY. Tìm một dải ruy băng màu đỏ và keo dán nơ pasta hoặc bất kỳ loại mì ống khác với nó. Sẳn sàng!
DẤU THỜI GIAN:
00:09 Thiên thần làm từ mì ống
00:22 Trang trí bàn giá rẻ
01:21 DIY vòng hoa Giáng sinh
01:55 Bông tuyết trang trí
03:07 Vòng hoa nhanh
06:31 Cây thông Noel thu nhỏ
------------------------------------------
Đăng ký 5 PHÚT THỦ CÔNG https://bit.ly/2F0If0m
Soi Sáng Youtube: https://bit.ly/2TPVZhq
CHUYỆN KỂ CÓ THẬT: https://bit.ly/2kkDoP7
123GO! Vietnamese: https://bit.ly/2m3P6y2
123 GO! Challenge Vietnamese: https://bit.ly/35f0N6r
Music by Epidemic Sound: https://www.epidemicsound.com/
Tài liệu chứng khoán (hình ảnh, cảnh quay và khác):
https://www.depositphotos.com

Lâm Vlog - Đi Cắm Trại Bên Bờ Sông | Phần 1: Câu Cá Nướng Gà Nướng Xúc Xích
Video liên quan:
- Đi Cắm Trại Bên Bờ Sông | Phần 2: Ngủ Qua Đêm và Nấu Mì Bằng Vỏ Lon Nước Ngọt
https://www.youtube.com/watch?v=lTYzpAYnwxA
► Đây chỉ là video mang tính giải trí, bạn nào thích thì hãy like, bạn nào nghiêm túc hoặc không thích cứ dislike, không sao cả.
► Các bạn hãy để lại bình luận cảm nghĩ của các bạn về video này nhé. ( VD: Như beep, như... bla bla gì đó cũng được )
► Nếu có thể các bạn hãy nhấn chia sẻ video này lên các trang mạng xã hội giúp mình nhé, cảm ơn tất cả các bạn.
→ Và đừng quên Đăng ký kênh Lâm Vlog của mình nha các bạn: https://goo.gl/M1x1oB
Liên hệ Quảng Cáo:
[email protected]

Wild camping naturehike opalus 2 tunnel tent https://www.naturehike.com/nat....urehike-ultralight-o
#naturehikeopalus #naturehike #wildcamping

#Outdoor #Waterproof Bag #Naturehike
ลิ๊งสินค้า
https://www.lazada.co.th/products/naturehike-outdoor-waterproof-bag-travel-single-shoulder-bag-messenger-bag-dry-and-wet-separation-waterproof-bag-nh19sb005-i631840194-s1210502118.html?mp=1&spm=spm%3Da2o4m.order_details.item_title.1
ติดตามเเฟนเพจได้ที่
https://www.facebook.com/PM-%E....0%B9%81%E0%B8%9A%E0%
